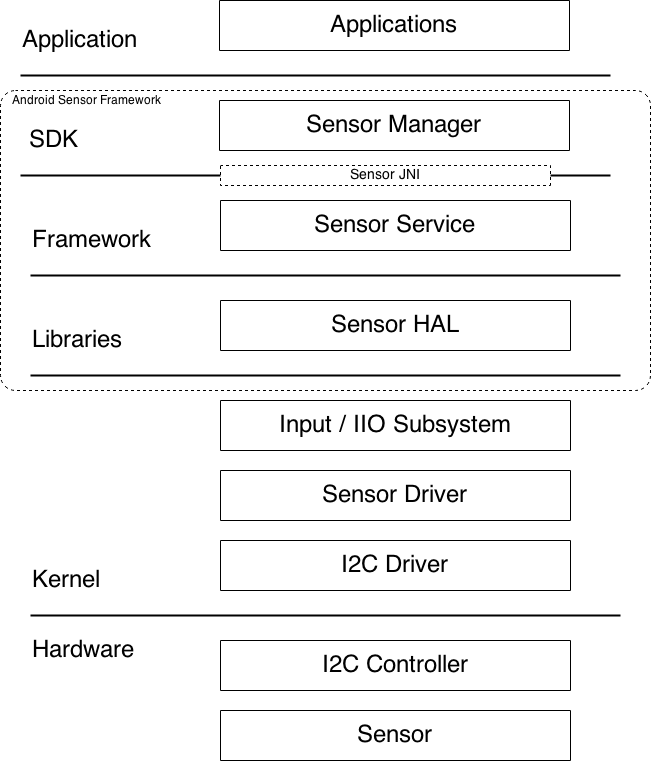
1. Overview Android Sensor Framework 的整体架构如图 1 所示:
Android Sensor Framework 可以分为 3 大部分,各个部分的主要功能如下:
SDK
Framework
Libraries
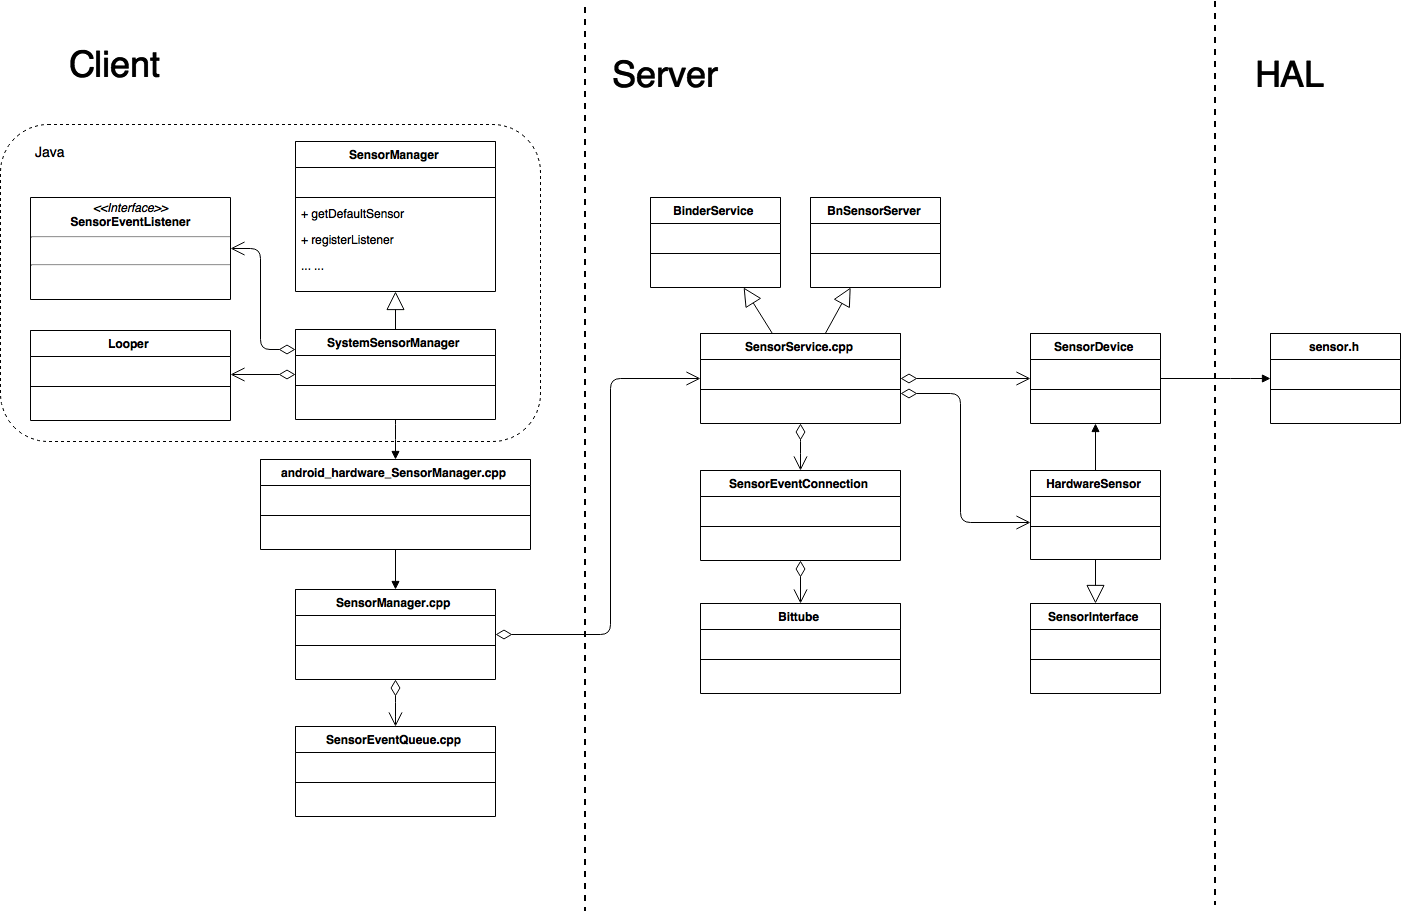
2. Android Sensor Framework 类图
3. Android Sensor SDK 图片 2 中的 Client 部分内容即为 Android Sensor SDK 的主要构成。主要类的主要功能如下:
SensorManager
SystemSensorManager
android_hardware_SensorManager.cpp
SensorManager.cpp
4. Android Sensor Native Framework 图片 2 中的 Server 部分内容即为 Android Sensor Native Framwork 的主要构成。主要类的主要功能如下:
SensorService.cpp
BinderService
BnSensorServer
SensorEventConnection
Bittube
SensorDevice
5. Android Sensor HAL Android 定义了一系列 Sensor HAL 接口,实际的 Sensor HAL 库需要实现这些接口,主要的接口如下:
5.1. SensorList SensorList 定义了 HAL 层提供的 Sensor,提供 Sensor 类型、供应商、功耗等信息。同时,HAL 层需要实现获取 SensorList 的回调接口。
1
2
3
4
5
6
7
8
9
10
11
12
13
14
15
16
17
18
19
20
21
22
23
24
25
26
27
28
29
30
31
32
33
34
35
36
37
38
39
40
41
42
43
44
45
46
47
48
49
50
51
52
53
54
55
56
57
58
59
60
61
62
63
64
65
66
67
68
69
static const struct sensor_t SensorList [] = { { .name = "LTR559 Ambient Light Sensor" , .vendor = "LITE-ON TECHNOLOGY CORP." , .version = 0 , .handle = SENSOR_HANDLE_LIGHT, .type = SENSOR_TYPE_LIGHT, .maxRange = 32767 , .resolution = 1 , .power = 0.1f , .minDelay = 0 , .fifoReservedEventCount = 0 , .fifoMaxEventCount = 0 , .stringType = SENSOR_STRING_TYPE_LIGHT, .requiredPermission = "" , .maxDelay = 500 , .flags = SENSOR_FLAG_ON_CHANGE_MODE, .reserved[0 ] = NULL ; .reserved[1 ] = NULL ; }, { .name = "LTR559 Proximity Sensor" , .vendor = "LITE-ON TECHNOLOGY CORP." , .version = 0 , .handle = SENSOR_HANDLE_PROXIMITY, .type = SENSOR_TYPE_PROXIMITY, .maxRange = 4 , .resolution = 4 , .power = 0.15f , .minDelay = 0 , .fifoReservedEventCount = 0 , .fifoMaxEventCount = 0 , .stringType = SENSOR_STRING_TYPE_PROXIMITY, .requiredPermission = "" , .maxDelay = 100 , .flags = SENSOR_FLAG_ON_CHANGE_MODE, .reserved[0 ] = NULL ; .reserved[1 ] = NULL ; }, { .name = "LTR559 Proximity Sensor [Wake Up]" , .vendor = "LITE-ON TECHNOLOGY CORP." , .version = 0 , .handle = SENSOR_HANDLE_PROXIMITY_WAKE_UP, .type = SENSOR_TYPE_PROXIMITY, .maxRange = 4 , .resolution = 4 , .power = 0.15f , .minDelay = 0 , .fifoReservedEventCount = 0 , .fifoMaxEventCount = 0 , .stringType = SENSOR_STRING_TYPE_PROXIMITY, .requiredPermission = "" , .maxDelay = 100 , .flags = SENSOR_FLAG_ON_CHANGE_MODE | SENSOR_FLAG_WAKE_UP, .reserved[0 ] = NULL ; .reserved[1 ] = NULL ; }, }; static int sensor_hal_get_sensors_list (struct sensors_module_t * module , struct sensor_t const ** list ) *list = SensorList; return ARRAY_SIZE(SensorList); }
5.2. sensors_module_t HAL 层需要定义一个 sensors_module_t,供系统在启动时加载 Sensor HAL 动态库。sensors_module_t 向上层注册获取 SensorList 和获取 Sensor 控制接口的相关回调函数。
1
2
3
4
5
6
7
8
9
10
11
12
13
14
15
16
17
18
19
20
21
22
23
24
25
26
27
28
29
30
31
32
33
34
35
36
37
38
39
40
static int open_sensors (const struct hw_module_t * hw_module, const char * name, struct hw_device_t ** hw_device_out) int status = -EINVAL; sensors_poll_context_t *dev = new sensors_poll_context_t (); memset (&dev->device, 0 , sizeof (sensors_poll_device_1)); dev->device.common.tag = HARDWARE_DEVICE_TAG; dev->device.common.version = SENSORS_DEVICE_API_VERSION_1_3; dev->device.common.module = const_cast <hw_module_t *>(hw_module); dev->device.common.close = device__close; dev->device.activate = device__activate; dev->device.setDelay = device__setDelay; dev->device.poll = device__poll; dev->device.batch = device__batch; dev->device.flush = device__flush; *hw_device_out = &dev->device.common; status = 0 ; return status; } static struct hw_module_methods_t sensors_module_methods = { .open = open_sensors }; struct sensors_module_t HAL_MODULE_INFO_SYM = { .common = { .tag = HARDWARE_MODULE_TAG, .module_api_version = 1 , .hal_api_version = 0 , .id = SENSORS_HARDWARE_MODULE_ID, .name = "ALS PS Sensor module" , .author = "Meizu Telecom Equipment Co., Ltd." , .methods = &sensors_module_methods, }, .get_sensors_list = sensor_hal_get_sensors_list, };
5.3. Sensor 控制和数据获取接口 HAL 层还需要提供实际控制和获取 Sensor 数据的接口,SensorService 中对 Sensor 的控制和数据的获取最终会调用到这些接口。
1 2 3 4 5 6 7 8 9 10 11 12 13 14 15 16 17 18 19 20 21 22 23 24 25 26 27 28 29 30 31 32 33 34 35 36 37 38 39 40 41 42 43 44 45 46 47 48 49 50 51 struct sensors_poll_context_t { sensors_poll_device_1 device; int activate (int handle, int enabled) int setDelay (int handle, int64_t ns) int poll (sensors_event_t * data, int count) int batch (int handle, int flags, int64_t period_ns, int64_t timeout) int flush (int handle) int close () }; static int device__close (struct hw_device_t *dev) sensors_poll_context_t * ctx = (sensors_poll_context_t *) dev; if (ctx != NULL ) { int retval = ctx->close (); delete ctx; } return 0 ; } static int device__activate (struct sensors_poll_device_t *dev, int handle, int enabled) sensors_poll_context_t * ctx = (sensors_poll_context_t *) dev; return ctx->activate(handle, enabled); } static int device__setDelay (struct sensors_poll_device_t *dev, int handle, int64_t ns) sensors_poll_context_t * ctx = (sensors_poll_context_t *) dev; return ctx->setDelay(handle, ns); } static int device__poll (struct sensors_poll_device_t *dev, sensors_event_t * data, int count) sensors_poll_context_t * ctx = (sensors_poll_context_t *) dev; return ctx->poll(data, count); } static int device__batch (struct sensors_poll_device_1 *dev, int handle, int flags, int64_t period_ns, int64_t timeout) sensors_poll_context_t * ctx = (sensors_poll_context_t *) dev; return ctx->batch(handle, flags, period_ns, timeout); } static int device__flush (struct sensors_poll_device_1 *dev, int handle) sensors_poll_context_t * ctx = (sensors_poll_context_t *) dev; return ctx->flush (handle); }
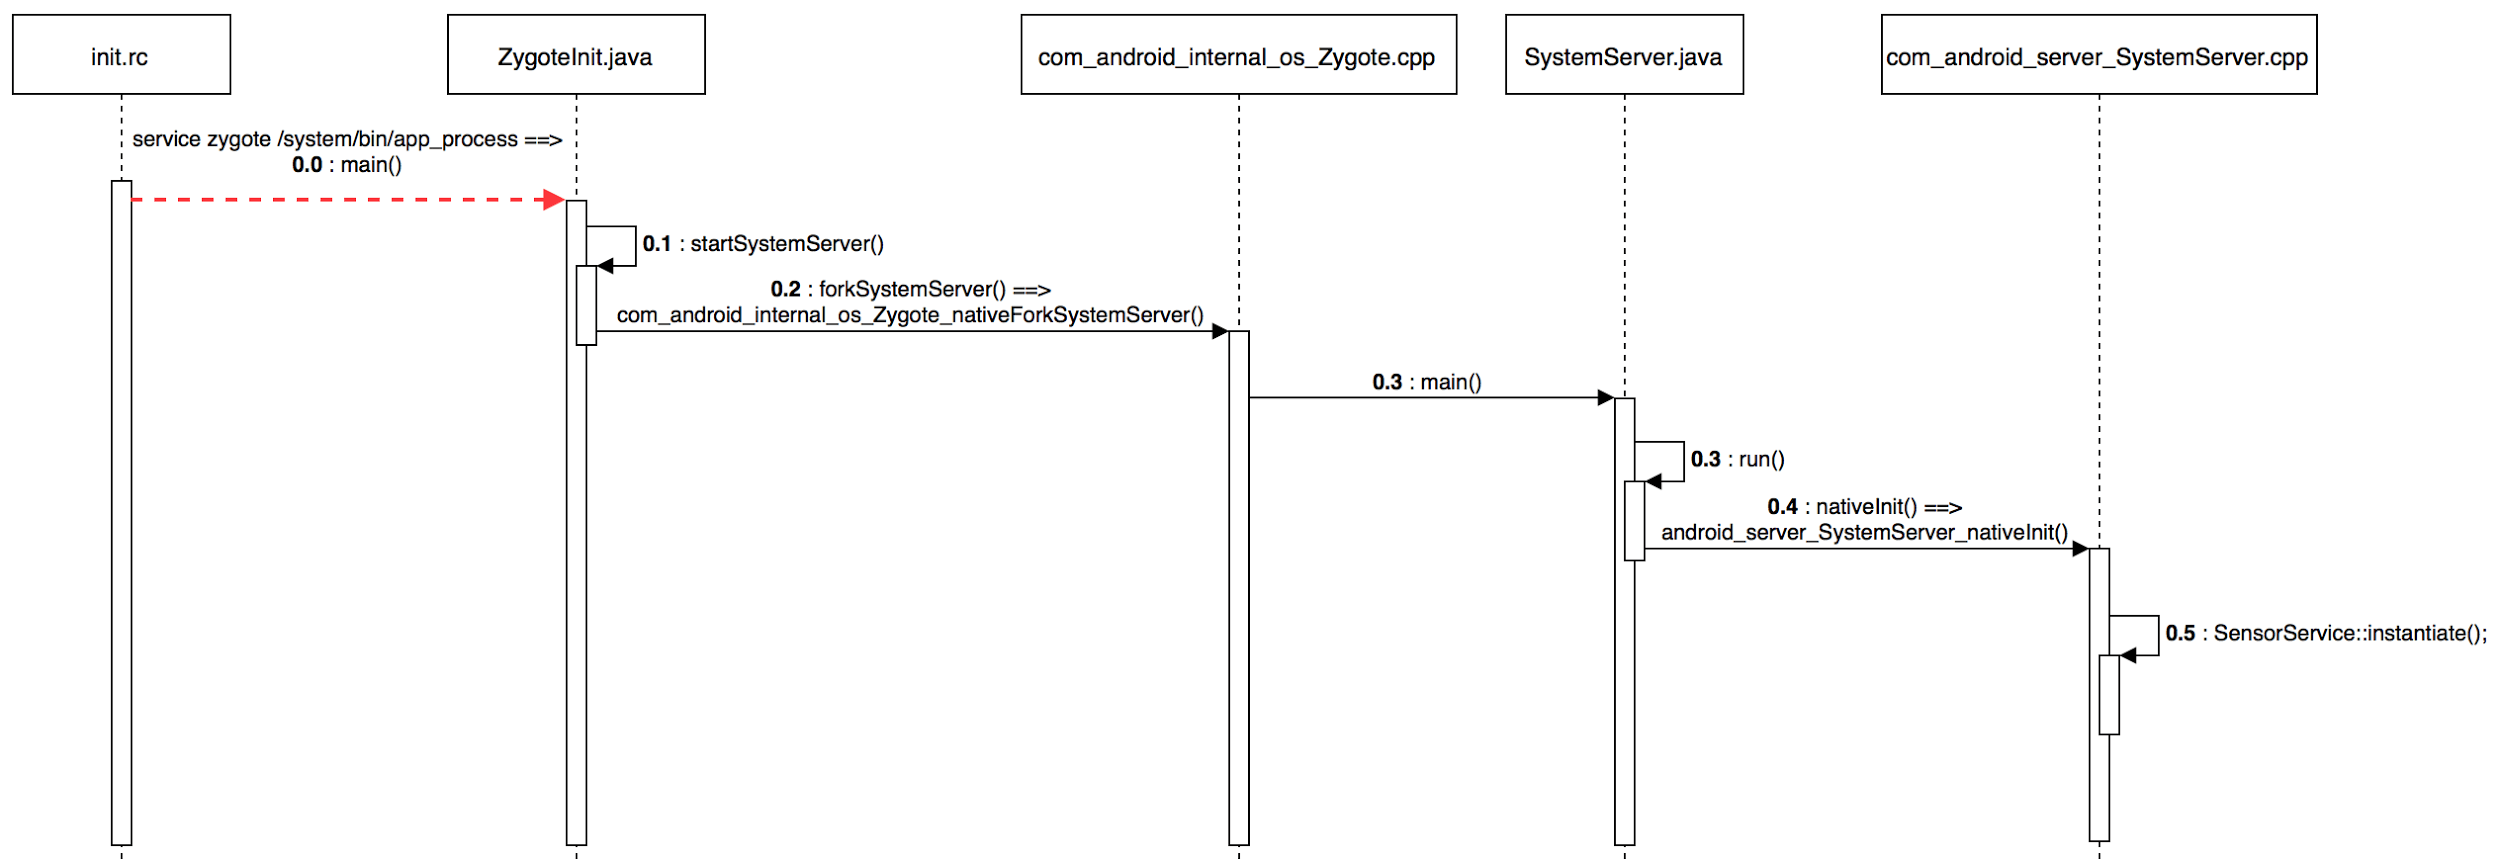
6. Android Sensor Framework的初始化流程 6.1. Android Sensor Service 初始化
Kernel 在启动完成后,会执行 init 程序,该程序接着解析 init.rc 文件,启动 zygote,最终会执行 Zyoteinit.java 中的 main 函数。
在 Zygoteinit 的main 函数执行过程中,会调用 startSystemServer 接口,该接口最终会调用 native 层的 nativeforkSystemServer 接口,进而启动 SystemServer ,调用其 main 函数。
在 SystemServer 的 main 函数中,会调用对应的 nativeInit 接口。在 nativeInit 中,会创建第一个 SensorService 实例。当 SensorService 第一个实例创建时,其 onFirstRef 接口将会被调用。
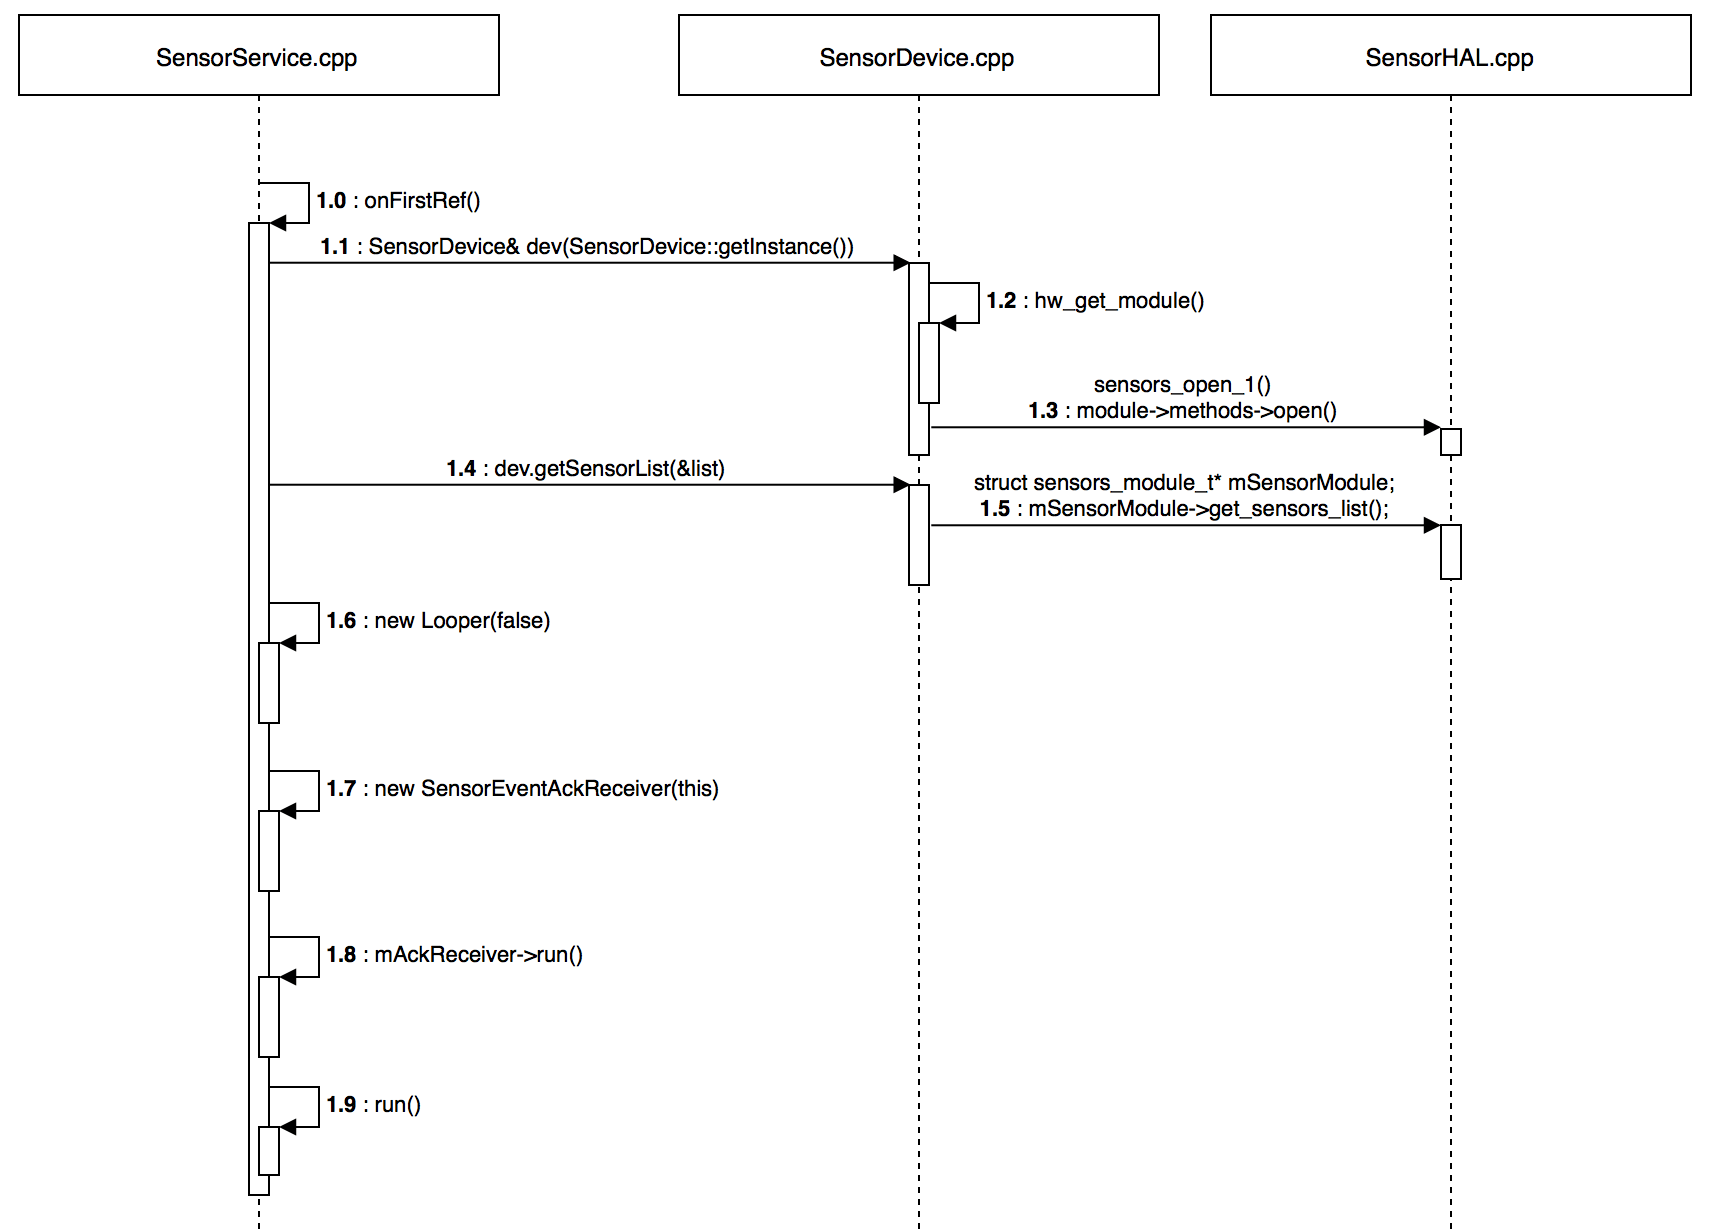
在 SensorService 的 onFirstRef 接口中,会创建 SensorDevice 的实例。在 SensorDevice 的构造函数中,会调用 hw_get_module 接口加载 Sensor HAL 的动态库,接着调用 Sensor HAL 提供的 open 接口,执行 Sensor HAL 的初始化。
6.2. Android Sensor HAL 加载 在 SensorService 创建 SensorDevice 时,会调用 hw_get_module 接口加载 SensorHAL 的动态库文件。
1
2
3
4
5
6
7
8
9
10
11
12
13
14
15
16
17
18
19
20
21
22
23
24
25
26
27
28
29
30
31
32
33
34
35
36
37
38
39
40
41
42
43
44
45
46
47
48
49
50
51
52
53
54
55
56
57
58
59
60
61
62
63
64
65
66
67
68
69
70
71
72
73
74
75
76
77
78
79
80
81
82
83
84
85
static int hw_module_exists (char *path, size_t path_len, const char *name, const char *subname) snprintf (path, path_len, "%s/%s.%s.so" , HAL_LIBRARY_PATH2, name, subname); if (access(path, R_OK) == 0 ) return 0 ; snprintf (path, path_len, "%s/%s.%s.so" , HAL_LIBRARY_PATH1, name, subname); if (access(path, R_OK) == 0 ) return 0 ; return -ENOENT; } int hw_get_module_by_class (const char *class_id, const char *inst, const struct hw_module_t **module ) int i = 0 ; char prop[PATH_MAX] = {0 }; char path[PATH_MAX] = {0 }; char name[PATH_MAX] = {0 }; char prop_name[PATH_MAX] = {0 }; if (inst) snprintf (name, PATH_MAX, "%s.%s" , class_id, inst); else strlcpy(name, class_id, PATH_MAX); snprintf (prop_name, sizeof (prop_name), "ro.hardware.%s" , name); if (property_get(prop_name, prop, NULL ) > 0 ) { if (hw_module_exists(path, sizeof (path), name, prop) == 0 ) { goto found; } } for (i=0 ; i<HAL_VARIANT_KEYS_COUNT; i++) { if (property_get(variant_keys[i], prop, NULL ) == 0 ) { continue ; } if (hw_module_exists(path, sizeof (path), name, prop) == 0 ) { goto found; } } if (hw_module_exists(path, sizeof (path), name, "default" ) == 0 ) { goto found; } return -ENOENT; found: return load(class_id, path, module ); } int hw_get_module (const char *id, const struct hw_module_t **module ) return hw_get_module_by_class(id, NULL , module ); } #define SENSORS_HARDWARE_MODULE_ID "sensors" SensorDevice::SensorDevice() : mSensorDevice(0 ), mSensorModule(0 ) { status_t err = hw_get_module(SENSORS_HARDWARE_MODULE_ID, (hw_module_t const **)&mSensorModule); ... ... }
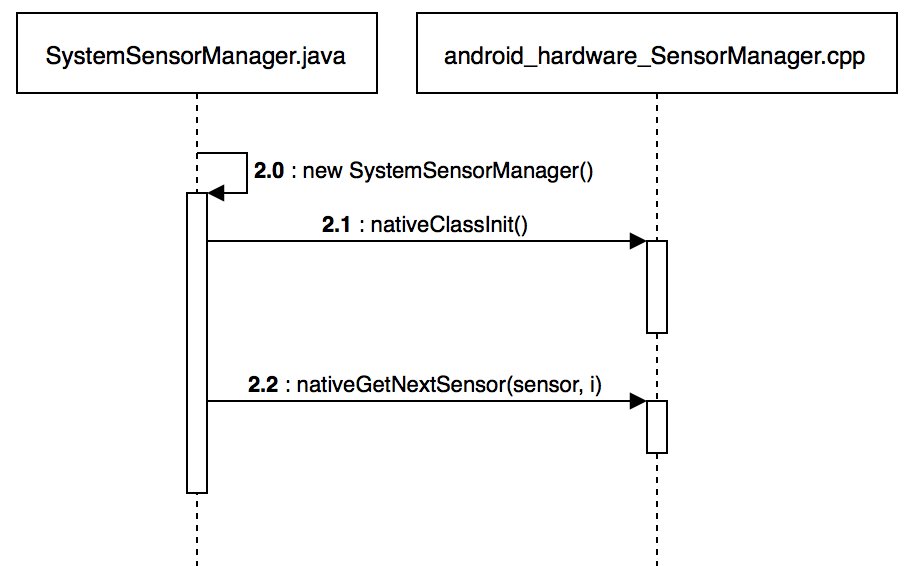
6.3. Android Sensor Manager 初始化
APP 在获取 Sensor 数据前,需要获取一个 SensorManager 对象。而在其构造函数中,会先调用 nativeClassInit 和 nativeGetNextSensor 获取系统支持的所有 Sensor 的参数(注,nativeClassInit 只会调用一次),包括名称、类型等参数。后续的相关接口,会用到这些参数。
7. Android Sensor Framework的数据流程分析
当上层调用 registerListener 接口时,相应的 sensor 就会被 enable。SensorService 在调用 HAL 提供的 enable 接口前,会先调用 batch 接口,对 sensor 的采样率、数据上报频率等进行配置。另外,如果 sensor 已经被 enable 了,那么 SensorService 就只调用 batch 和 flush 接口。

This is copyright.